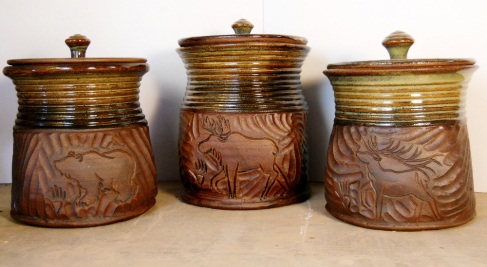
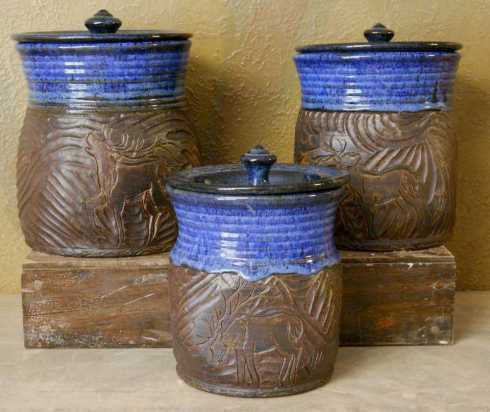
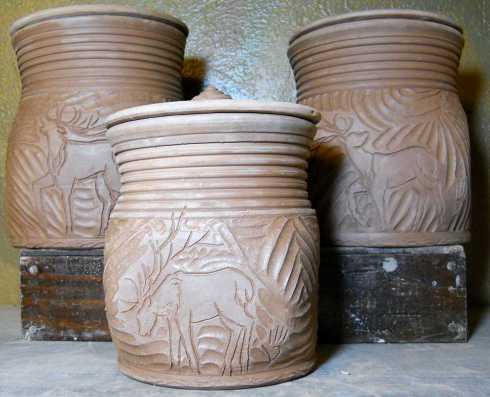
Here’s a great canister set I recently finished for a new friend!
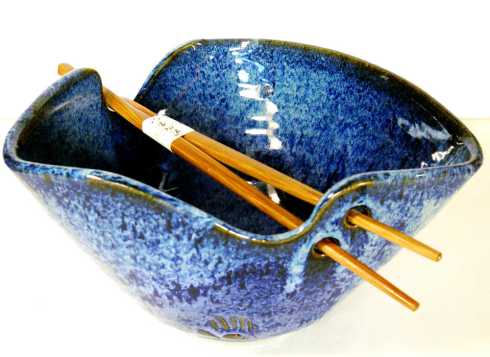
Chopstick Bowls!
11 Oct
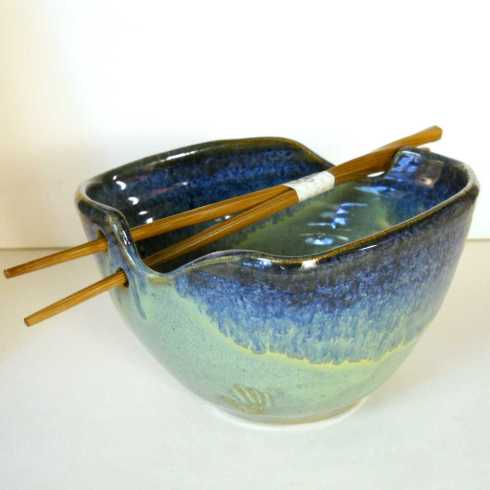
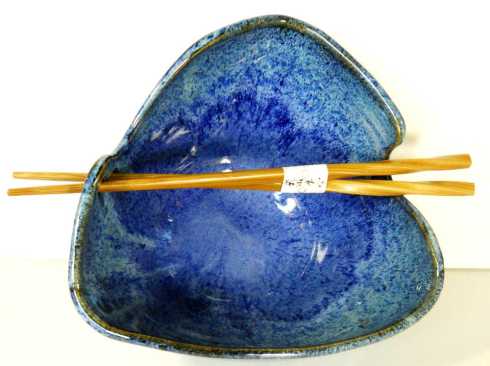
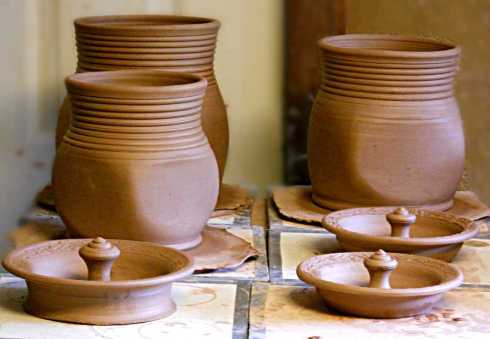
I learned a lot at the Farmers’ Market this year. Mostly from my customers. I got requests for all sorts of interesting things, and rice bowls were on the wish list. I had never heard of such a thing, but now I’m in love with rice/chopstick/noodle bowls. Here are a few samples of what I came up with. I even ordered a whole boatload of chopsticks to go with them! You can find my rice bowls at my Etsy shop (the link at the right; over there . . . —> No, no . . . down a bit . . . yeah, you found it. 😉
Or if you’re in Rapid City, drop me an e-mail and I can save you some money on shipping and packing. I will be at the Creative Hands Autumn Bazaar on Oct. 19 from 4:00 p.m. to 8:00 p.m. and Oct. 20th from 9:00 a.m. to 4:00 p.m. That’s next (coming) weekend, Friday and Saturday — in the Fine Arts Building at the Central States Fairgrounds.
In addition, I’ll be displaying at the Pinedale Elementary PTA Bazaar on Saturday Nov. 5th from 8:30 a.m. to 3:00 p.m. The Pinedale PTA has been putting on the biggest art show in town for 30 years now, so I’m excited to have been accepted. Bring your Christmas list and your appetite. They’re cooking up some great treats, I hear, and more than 45 high-quality vendors will showcase their artworks and fine crafts, just in time to help you get the perfect gifts for all your loved ones. Especially if they’re rice eaters!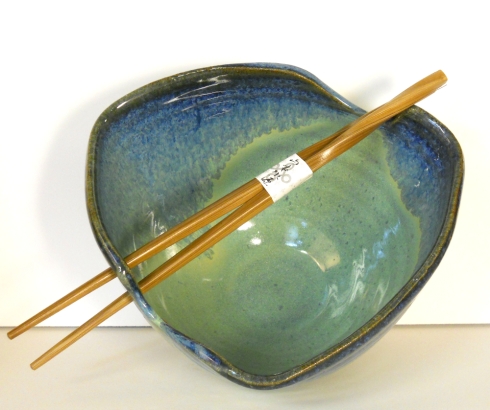
I didn’t know what a rice bowl looked like, so of course I searched it on-line. I never print off pictures or try to memorize the images I see when I do this. My goal is to get an idea of, well in this case, “rice bowlness” so to speak. After a half-hour or so or looking, I went to bed and when I woke up, this was what I had in my mind. Unless someone asks me to, I don’t think I’ll try to make them in any other way.
I’ve looked at rice bowls since and not seen any quite like these, and I have an affinity for the shape and the way the chopsticks lie in these bowls. They’re not tiny little things meant only for rice, either. They’ll hold a nice-sized serving of anything you’d like to eat with chopsticks. I’m pleased with them. 😀
Canister Set
1 JunI was recently commissioned to make a set of canisters, and here they are at their inception. I also shot a video of the throwing of them, which I’ll post a little later — maybe tomorrow. These canisters will be paddled square, carved with geometric designs, and adorned with an elk motif. I believe they’ll be ready to carve by tomorrow sometime, and I’ll post some more photos then. 🙂
Marauding Mammoth
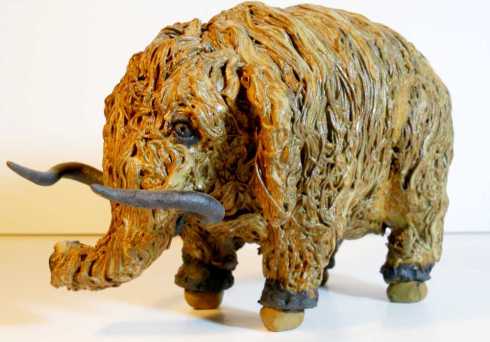
26 MayMy wee marauding mammoth started life as a bottle. Yes, the little guy is a piece of wheel-thrown pottery. Who’d of guessed it? 😉 The bottle’s neck is right in the middle of his little noggin. Of course, this piece is technically thrown and altered. I made his hair with an extruder, which is a kind of grown-up Play-doh machine (with a grown up price tag to match). As for the rest of him? These fingers and a sharpened pencil. 😆
I know what you’re thinking; why is he standing up on those goofy balls? There is a reason — really. I made him to display on a beaver pelt, and if he doesn’t have a bit of a lift, the beaver fur tickles his little tummy. He got tired of sitting around at my house, though, and he’d like to go adventuring. I won’t be at the Farmers’ Market on Main Street Square this Saturday because the weather is supposed to be miserable. But I’ve promised him he can come with next Saturday. If you want an introduction, come and visit the Jenny Gulch Pottery booth. You can’t miss it — it’ll be the only pottery booth with a mammoth in attendance. See you there!
Merry Horse Cup
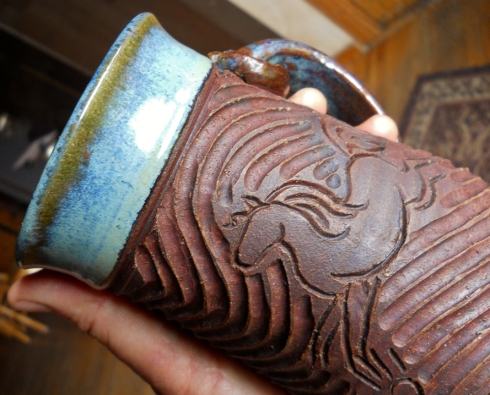
24 MayI love my cup. It’s the merry horse, leaping like he has wings on his heart. I’m not sure I could ever make another horse as merry as this one. 😀
It’s lovely and thin — I can feel the volume it encloses and the thinness as I hold it. The hand carved background is a great place for my happy little pony to live. The glaze is called Twilight, and it’s a little different every time I make it (which I actually like). The carved portion isn’t glazed on the outside. It’s colored with an iron oxide wash. It doesn’t wash off and it gives the clay a variable warm color. I discovered this technique by accident, but it turns out I’m not the first to have used it. Reinventing the wheel . . . again. 😆 Every time I think I’ve made a great discovery, I soon find someone’s been there before me.
I have other cups like this one, but this one isn’t for sale. There aren’t any at my etsy site at the moment, but if you’re interested, let me know. I can send you a picture of some that I do have, or make one especially for you.
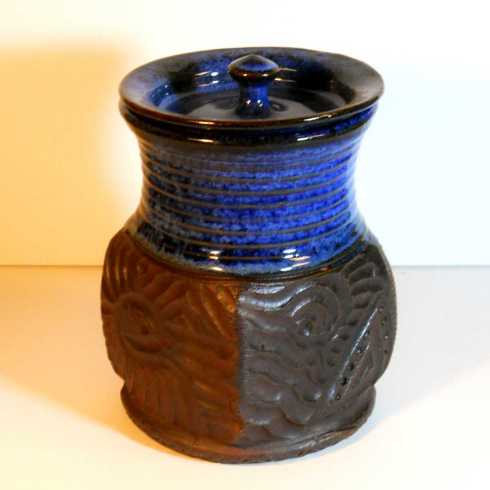
A Square Canister from the Potter’s Wheel
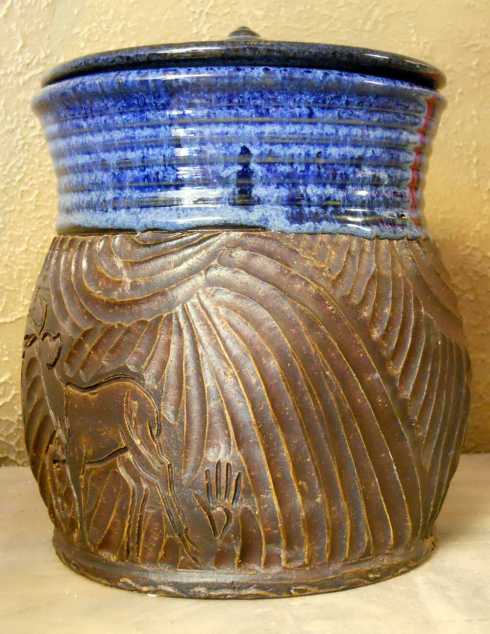
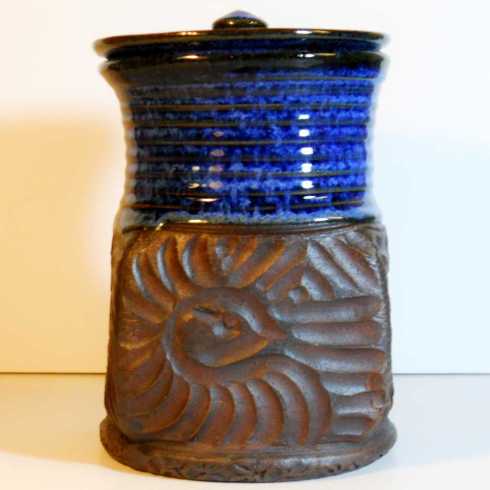
19 MayWell, not completely square, it’s true, but square enough to give it some style and to allow it to sit up nice and cozy with its brother and sister canisters. It doesn’t hold quite as much as it could have, if left round, but there are definite advantages to being a square.
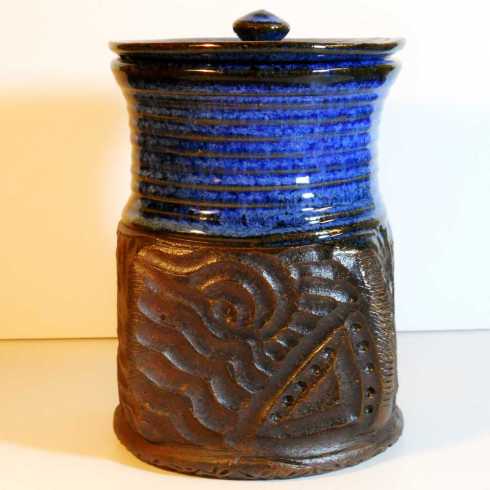
I order to make the square sides, I paddled the canister with, well, a paddle. You have to do this at just the right stage. If you try too soon, the pot is all wet and sticky and flabby. It doesn’t work well if you wait too long, either, because the clay cracks when you start to form it. Then you have to spend time sticking things back together. I know these things from having done them wrong so many times!
It’s hard for me to resist doodling on my pottery, as you can see. I don’t think I like the little dots down on the bottom right, but changing it at this point is not an option :lol:. I get carried away sometimes. This piece was an experiment, so I don’t mind so much that it didn’t turn out perfectly. I’ll most likely keep it for myself, and I can turn this side to the wall!
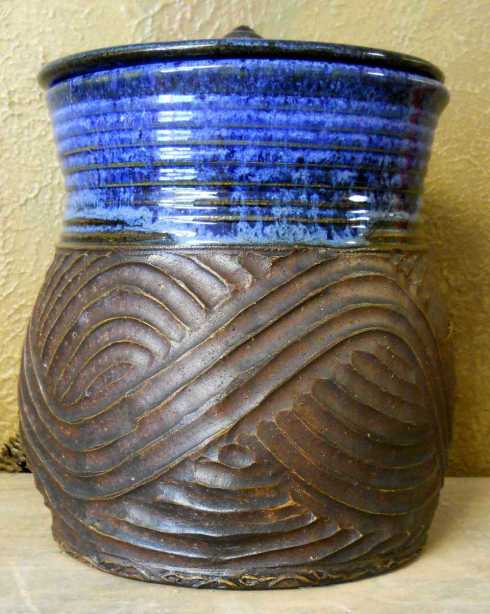
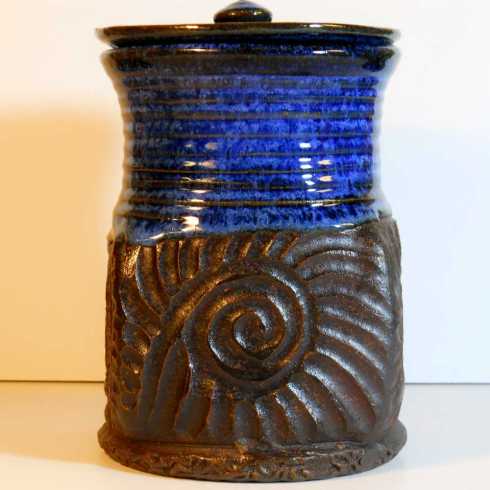
Now this side I like. I think I’d like it better if I’d continued the little lines inside the wider swirl the rest of the way around, but it’s not bad if I do say so. That’s the thing about doodling with a pen; you can always add more. Not so much with clay — not after you put it in the kiln, anyway.
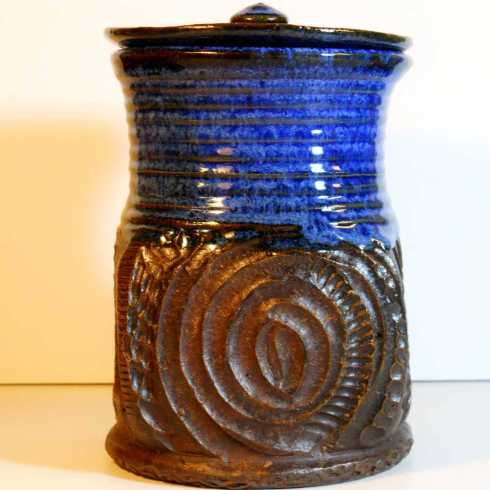
Now this one is really nice. Well balanced and interesting. It has a focal point and it’s not too busy. I’ll have to remember to keep this in mind for next time. 🙂
The surface here looks a little more matte. In real life, it’s just like the other sides, though. Maybe the sunlight has changed. At any rate, it seems to me to go well with the swirly design next to it. These two sides are my favorites, for sure.
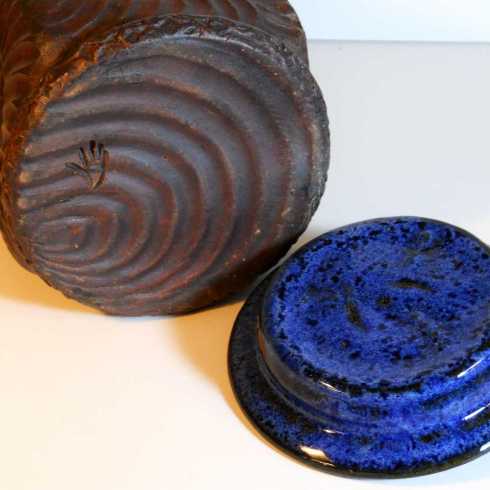
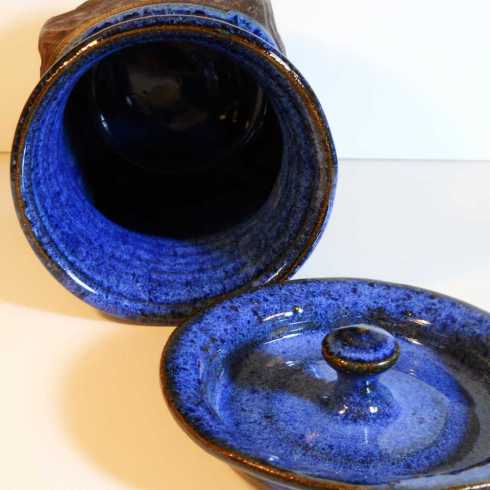
I like to cut off my pottery from the bat (the surface on top of the potter’s wheel platform) with a ballpoint pen spring stretched between two handles. It gives it a cool pattern, as you see.And finally, the inside of the canister and the top of the lid. Now you know this pot almost as well as I do myself! Maybe I’ll do another one and post some photos of the process in making it.
Blessings, Cindy
An Artistic Gardening Project
18 MayMy mom has decided she wants a garden. No, not radishes and snap beans — the kind of garden where you have an ornate metal bench and a water feature and (hopefully) a little bit of shade to sit and read and watch the birdies chirp, etc. 😉 So we ordered some tall black metal fence panels from Menard’s and borrowed a tiller from one of the brothers in our church. It was his dad who actually handed over the tiller — from his truck tailgate to mine — and he looked worried when he did it. He took quite a long time explaining to me how the tiller worked and trying to impress on me just how hard it was going to pull . . . but words can’t convey a thing like that.
I managed to go over the proposed 12′ x 18′ garden plot three times, lowering the tiller blades each time, but my muscles turned into noodles after that. So I quit for the day. When evening rolled around and I still couldn’t lift my hands (okay, that’s a teensy exaggeration), I called my brother and let him know he’d be tilling Mom’s garden in the morning. Hey, at least he didn’t have to do the hard part, cutting through all that million year old sod!
So for all of you who’ve always wondered what it looks like to till a garden plot with a rear tine tiller, this is your lucky day. I remember seeing ads in the Mother Earth News for tillers where a beautiful, slightly built lady is walking along beside the tiller, guiding it with one hand. It wasn’t quite like that . . .
It’s a good thing we didn’t decide to make a huge vegetable garden. I think if I ever do that, I’ll rent a tractor! Only the growing season up here on the mountain is too short to grow much of anything besides thistles and pine cones. Now for the fun part — figuring out the garden layout. I’ll keep you posted. 🙂
Tallying Up
14 MayI got tired a while back of writing my business name at the top of each receipt. Yes, it’s a small thing, but it seemed to me that there were a number of reasons to have custom receipts printed. First, I wanted to give customers my information. Second, in a busy show, it’s challenging to keep up with wrapping and bagging, let alone needing to add another line to the receipt. So I went to a printer’s shop and asked for an estimate to have receipts printed. Ouch!!! Apparently they’re making them from gold leaf now-a-days. To be fair, my daughter told me later that I’d happened to stop in at the most expensive printer’s in my town. Perhaps if I’d chosen another shop things would have been different . . . .
Several hours later I’d designed my sales invoice in MS Word, and after another hour or so, I finally figured how to print them two to a page and have them end up precisely on top of one another once I cut the page in half and stacked them. (I wanted half-sheet receipts — the kind you get in most common receipt books.) About this time I was beginning to see a little bit of what the printer was charging for. 😳 Still, they had to have this stuff already templated, and besides — they presumably know what they’re doing. What took me so long might be 15 minutes for them. Still, it wasn’t 15 minutes for me! Never mind. Next time it will go faster, right? (I haven’t gotten to ‘next time,’ so I can’t say for sure, but surely it will!)
I ordered some padding compound from Dick Blick Art Supplies, and when it arrived, I took my uncut receipts to my mom’s to use her super-duper paper cutter. And it really is super duper. Only I didn’t realize that 8.5″ x 11″ paper isn’t really 8.5″ by 11″. It’s more like 10 7/8″. I should have seen that coming, but I didn’t. So as I’m sure you’ll realize straight away, I ended up cutting the first batch of receipts unevenly. Oh well. I would still make them work. After that little glitch, I cut the remaining receipts correctly, cleaned up my mess, took my precious little slips and headed back home. The pad compound worked great. I cut a back from some heavy stock, laid the receipts on top, and jogged the whole thing so that the top edge would come out even. I trapped my receipts (with the edge to be glued facing out) in a flower press my dad had made for me years earlier, and which I’ve been using as a book press. You could also use bulldog clips. I then painted the edge with pad compound, and went away and forgot about them until several hours later. Then I went into my art room to look for something, and there they were! The glue was dry, and they were perfectly padded together. Hooray! I promptly forgot (and still can’t remember) what I had been looking for.
It wasn’t enough that I had a receipt book. I wanted a folder to put it in. I chose to make it from some inexpensive watercolor paper I had previously made the mistake of buying in order to save a penny or two. It isn’t much good for watercolor, but it makes a great receipt book cover. Here’s a photo of the book, closed, after I had it at market all day. As you can see, there were a few quiet moments:
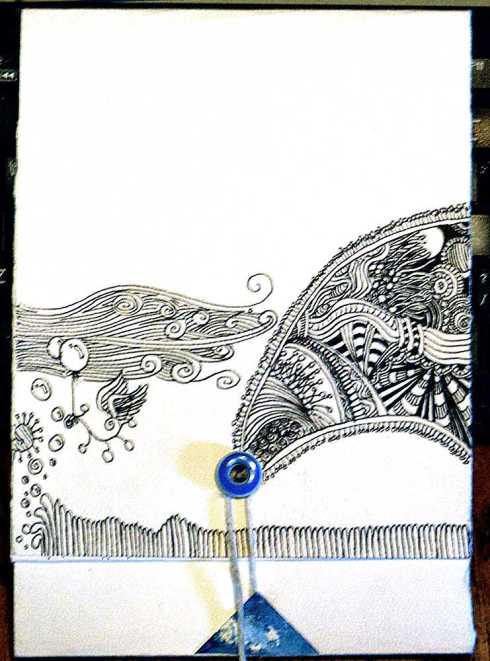
And here is a photo of the opened receipt book:
When it’s been doodled all over, I’ll spray it with matte varnish and then paint matte medium over it. Then it will be easy to keep clean and nice. I wish I hadn’t used a white string, because it’s already starting to look dingy. So . . . when I get around to it, I’ll dye the string blue with a permanent marker. That should help a lot.
Counting up all the time I put into this silly little thing, the print shop would have saved me money. But it’s SOOOO cool! Plus, it won’t take me long to make the next receipt book now that I have the files ready to print. And of course the cover is reusable. I hope this will be useful to you — help you save a few dollars and give you something to doodle on in the interludes between the mobs pressing in to buy your beautiful wares. 🙂





Recent Comments